VitalPBX requires Centos 7 minimal.
Here are the steps to follow:
- If you don’t have installed wget command, install it in the following way:
yum install wget -y
- Download the script:
wget https://raw.githubusercontent.com/VitalPBX/VPS/master/vps.sh
- Set correct permissions to script:
chmod +x vps.sh
- Excute the script to install VitalPBX on VPS:
./vps.sh
Festival translates the text into speech and can be used on the VitalPBX dial plan.
Installation
Copy install.sh to your home directory and procedure to execute.
[root@vitalpbx ~]# cd /
[root@vitalpbx ~]# wget https://raw.githubusercontent.com/VitalPBX/pico2wave/master/install.sh
[root@vitalpbx ~]# chmod +x install.sh
[root@vitalpbx ~]# ./install.sh
Voice Select
If you want to change the voice you must go to the voice configuration files that is in:
/usr/share/festiva/lib
Edit the voices.scm file and near line 328 will show the list of available voices, order in such a way that the first one will be the one we hear.
After selecting the voice, the festival service must be restarted:
systemctl restart festival.service
Now Dial
*8866
You should hear the following sentence
This is a simple Vital P B X text to speech test in english.
This script makes use of pico2wave translate text to speech service in order to render text to speech and play it back to the user. It supports a variety of different languages.
Requirements
Perl: The Perl Programming Language
perl-libwww-perl: The World-Wide Web library for Perl
perl-LWP-Protocol-https: For HTTPS support
sox: Sound eXchange, sound processing program
Installation
Copy install.sh to your home directory and procedure to execute.
[root@vitalpbx ~]# cd /
[root@vitalpbx ~]# wget https://raw.githubusercontent.com/VitalPBX/pico2wave/master/install.sh
[root@vitalpbx ~]# chmod +x install.sh
[root@vitalpbx ~]# ./install.sh
Now Dial
*8877
You should hear the following sentence
;;Play mesage in US English:
This is a simple Vital P B X text to speech test in english.
;;Play mesage in GB English:
This is a simple Vital P B X text to speech test in british english.
;;Play mesage in German:
Dies ist ein einfacher Vital P B X Text-to-Speech-Test in German.
;;Play message in Spanish
Esta es una prueba simple de texto a voz de Vital P B X en Español.
;;Play message in french
Il s'agit d'un simple test Vital P B X text to speech en french.
;;Play message in french
Questo è un semplice test di sintesi vocale di Vital P B X in italiano.
Telemarketers are the worst. They have no souls. They feed off of the misery of others. No one likes them. Luckily, a nice British gentleman by the name of Lenny has come to save the day.
Setting up Lenny in VitalPBX is a pretty simple task, and is also a really nice primer into Asterisk custom contexts, and the power of scripting.
First, you will want to create the Lenny custom context in Asterisk. SSH into your FreePBX and use your favorite editor to edit /etc/asterisk/extensions_custom.conf. Add the following lines of code
First, you will want to create the Lenny context in Asterisk. SSH into your VitalPBX and use your favorite editor to edit /etc/asterisk/ombutel/extensions__80_lenny.conf. Add the following lines of code:
vi /etc/asterisk/ombutel/extensions__80_lenny.conf

[Lenny]
exten => talk,1,Set(i=${IF($["0${i}"="016"]?7:$[0${i}+1])})
same => n,ExecIf($[${i}=1]?MixMonitor(${UNIQUEID}.wav))
same => n,Playback(Lenny/Lenny${i})
same => n,BackgroundDetect(Lenny/backgroundnoise,1500)
Next, use WinSCP to copy the Lenny sound files into /var/lib/asterisk/sounds/Lenny (you may have to create the /Lenny directory).
Now create a Custom Context in VitalPBX for which you have to go to PBX/Applications/Custom Contexs. It has to be seen as shown below
VitalPBX High Availability
High availability is a characteristic of a system which aims to ensure an agreed level of operational performance, usually uptime, for a higher than normal period.
Make a high-availability cluster out of any pair of VitalPBX servers. VitalPBX can detect a range of failures on one VitalPBX server and automatically transfer control to the other server, resulting in a telephony environment with minimal down time.
We have created an article that talks about this.
Yes, we do have that option. You can read a detailed guide on how you can do this on this article we wrote about High Availability.
No, when you make a High availability Deployment, both servers need to have the same specifications, meaning same CPU, Memory, Storage, and Licensing. So if Server A has an Enterprise License, then Server B needs to have a separate Enterprise License as well.
Not at this moment. High Availability with VitalPBX is designed for a Data Center environment, where you have full control of the network and installation process. Since you require to have three IP addresses, and need to make some customizations at the moment of installation. You can deploy High Availability on a Virtual or Physical Environment no problem, as long as you have control over network and installation. The machines could be on different locations, as long as they belong to a connected network where the can freely see each other for configuration replication.
When you create the Tenant, go to Calls Routing and add in Allow Tenant Trunk all the Tenant you want to communicate with.
Then you go to the previously created Tenant and you are going to create a Trunk and in the type you select Tenant and in the Tenant* field you associate it with the Tenant you want to communicate with.
Finally you go to Outbound Routes Create a route, select the trunk created previously and define in the Dial Patterns the prefixes or the patterns of the extensions you want to call.
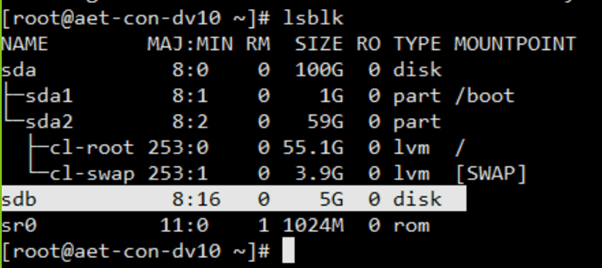
The first step is to format our new disk with the Linux LVM format. After connecting or installing the HD, we will use the command “lsblk” to see the name assigned to our new drive.

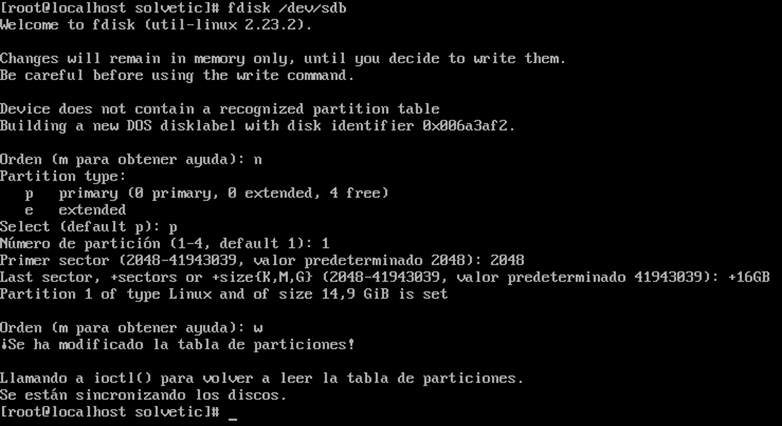
Now that we have the name, we will use the command “fdisk” to format the disk.
- fdisk /dev/sdb
- n (new partition)
- p (primary)
- (Press ENTER) (Use default partition number)
- (Press ENTER) (Use default first sector)
- (Press ENTER) (Use default last sector)
- t (change the partition type)
See the screenshot for the options you should pick

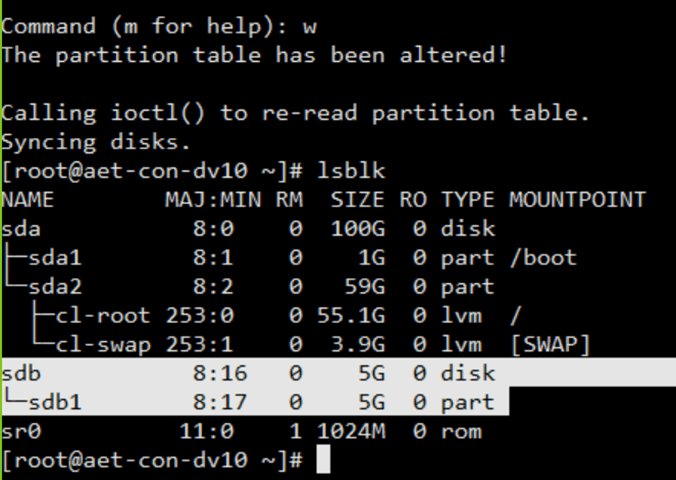
List the block device again to display the new disk partition /dev/sdb1

The next step is to format the new hard drive with the desired file system using the command
mkfs (make file system)
mkfs.ext4 /dev/sdb1
Mounting The Disk
First, in the root directory, we will create a new folder named “recordings”, here, we will mount our new disk temporarily for synchronizing the existing recordings.
- mount /dev/sdb1 /recordings
- mv /var/spool/asterisk/monitor/* /recordings/
Now that we have the recordings in our new hard drive, we will umount our hard disk for mounting it permanently at /var/spool/asterisk/monitor. For this, we will need to edit the file “/etc/fstab”, and add the following line at the end of the file.
/dev/sdb1 /var/spool/asterisk/monitor ext4 defaults 0 0
We can test that everything is well configured using the command “mount -a”. This command will mount our disk in the monitor folder. To test that all the data is there we can use the command “ll” to check that all our previous files or recordings are listed.
ll /var/spool/asterisk/monitor/


